Today I downloaded the trial version of Sure Cuts A Lot Version 2 (SCAL V2). I was excited to try it out with my Cricut Expression machine since the creators advertised that the software can use any font on your computer to cut! No more font cartridges!
I downloaded the trial software from a website called mycuttingbuddy.com. The process was easy, click on the version you need for your computer, PC or Mac, then add the free trial version to your cart. You will have to do the entire check out process even though you are paying nothing. No credit card is required. Then after you complete the process, you get to download the software. It installed pretty quickly on my mac.
Like any new program, it took a few minutes to figure out where everything is. It starts you off with the pointer so you can add objects, you have to click on the text button to add text. Then on the side (for my computer it was on the right side) there is a panel with all the fonts, sizes, and all the speciality buttons just like your Cricut or Gypsy! You can flip your words, black them out, move them closer together, just to name a few things. You can also change your mat size, zoom in and out, move around on the mat, etc! I am a little sad that the cartidges don't work with the program but that was to be expected since it's not a ProvoCraft product.
I started simple so far, I have cut a "T" for my first name. I chose my font, size, position on the mat, and it looked great. I was ready to cut.
Here are a few things I learned right away: 1. You have to have a cartridge in the Cricut, otherwise, it won't cut. The mat for the buttons is helpful too if you are like me and have been relying on the gypsy and forgotten where the load & unload buttons are! 2. You need the cable to connect to your computer (same cable as my printer used). 3. There will be one or more horizontal lines cut through your image since this is a trial version, I read that the full version will not do this (phew!)
I was quite happy with the design after it finished cutting. Everything cut all the way through, the size was what I had wanted, it cut exactly where it was laid out to cut and I think the image looked great. I can't wait to try a few more things on it!
I was trying to make an image into an SVG file and it worked! It was really simple and fun! I can't wait to explore this option more! For now, I'm going to find more fonts that I love and maybe looking into downloading some free SVG files! woohoo! I'm having so much fun Creating like Crazy!
Saturday, April 9, 2011

Monday, March 28, 2011
wedding bucket
My hairdresser is engaged and going to be married in 2 weeks. Last time I saw her she was talking up a storm about her wedding! It got me very excited for her! I decided that I wanted to make her something simple so this is what I came up with.


This is the paper that goes inside the clear bucket. The background is black, the shadow on the word is purple and the LOVE is in shiny white. The lettering was done on the Cricut using my Gypsy Font.

This is the top of the bucket. I wanted a large flower for the top but couldn't find what I was imagining.

Side shot, the hanging washer is used to open the can lid.

This is the candle i decorated inside the bucket. It is a small present but I wanted to give her something and with my limited budget with other weddings and such, I was happy with how it turned out. The words were cut on the Cricut using the Sweetheart cartridge and the Gypsy. This project took about 3 hours to complete but was well worth it.
Don't forget, go out there and Create like Crazy!
Friday, February 18, 2011
Bella's birthday!
My friend at work had a baby about 1 year ago on Thursday. She is part of my work unit so I got to be involved in throwing the shower. Bella was turning 1 and we thought it would be fun to have a little birthday party for her at work since I will not be able to attend her birthday party outside of work. I decided it was time to dust off the cupcake tower! I bought it from Wilton and I love it! it's compact when you break it down, you can theme it however you like and it holds 24 cupcakes with ease. You can use it for anything really, fruit, candy, etc but I love the look of cupcakes on this tower. 

I had made a birthday sign for her Saturday party so with those colors in mind, her cupcake toppers were pink, green and had the number 1 on them. I covered the tower with patterned heart pink and red paper. For the toppers, I used my SU! scallop punch to make the pink flower, my Cricut & Gypsy to make the #1 and a circle punch for the white background. I taped them to a toothpick and in no time at all, they were done!
Birthday parties are a great inspriation so go out there and create like crazy!


chocolate covered day!
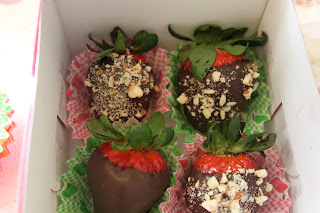
This Valentine's day I decided that I would try winning my man the way the old saying said to "the way to a man's heart is through his stomach." My plan was to make a box of chocolate dipped strawberries and his favorite Apple Pie Caramel Apple. Because whenever I walk by the chocolate factory in the mall I always want an apple and they charge so much! I decided to try to make them for myself and also to try to make them by the slice so you get more caramel & chocolate per bite!
I figured since I only had 2 hours, I should try the apples first. I chopped them, sprinkled lemon on them and then dipped them into chocolate that I melted on the stove. Didn't work. I had laid out parchment paper and that was a mistake too. Here's what I learned - use wax paper! It doesn't stick!!! Also, don't make your caramel too hot, otherwise, it will slide right off!

Next, I dipped the apples into white chocolate. This worked well except that it warmed up the caramel so it didn't look clean. My tip, refrigerate before dipping into the chocolate! Lastly, I rolled the apple in the sugar and cinnamon mix. Now that worked out quite well! lol!
So, while my apples looked lumpy and nothing close to elegant (which is why there is no picture!), they did in-fact taste good!
Onto the strawberries. Now these actually worked out very nicely. I dipped them, decorated them and put them into small cupcake holders. My tip here, Don't put them into the cupcake holders directly. Place them on wax paper to dry in the refrigerator and then transfer them to the cupcake holders. why? Because if you place them directly into the cupcake holders, the chocolate attaches to the holder instead of staying on the strawberry and it just doesn't look as nicely put together.
From my kitchen to yours, go and create like crazy!


Monday, February 7, 2011
Yudu Update
My Yudu creations have been put on hold. I received my machine and it does come with everything to get started but it really, just gets you started! There isn't any emulsion remover so you can do one design and then you'd be stuck! If you don't do the emulsion correctly the first time, then you are in trouble!
So today I found some good deals online and ordered my liquid emulsion kit which comes with remover, white Yudu ink, and an emulsion trough which puts the emulsion on the screen smoothly. I was really looking forward to saving money with this machine by making my presents, and hopefully that will be true, but it feels like i'm spending a lot on supplies as of right now. I'm looking forward to my priceless creations though. So, once I get my products, I'll be ready to Create like Crazy!
So today I found some good deals online and ordered my liquid emulsion kit which comes with remover, white Yudu ink, and an emulsion trough which puts the emulsion on the screen smoothly. I was really looking forward to saving money with this machine by making my presents, and hopefully that will be true, but it feels like i'm spending a lot on supplies as of right now. I'm looking forward to my priceless creations though. So, once I get my products, I'll be ready to Create like Crazy!
Creative Card Day with Michelle!
What do you think of when you think of Sunday February 6th? I'm sure you are saying - SUPERBOWL! Well, for non-football fans, Michelle & myself, we decided to have a Creative Card Day!
Michelle is super organized and was ready with 3 cards already set up in her Gypsy! Me on the other hand, came with instructions for a card I never tried making and a bunch of supplies hoping that I would be able to create one card! Thankfully Michelle's creativity carried over to me and inspired me to createlikecrazy!


 In a total of 6 hours we created 5 card designs and mass produced 8 of each design for a grand total of 40 cards in one day! So here are the 5 designs. I did a close up on the 2 I created. I completely adore the 3 that Michelle made!
I can't wait to use all of my fun pun stickers that she made for me! =) Till next superbowl, Create like Crazy!!!
Michelle is super organized and was ready with 3 cards already set up in her Gypsy! Me on the other hand, came with instructions for a card I never tried making and a bunch of supplies hoping that I would be able to create one card! Thankfully Michelle's creativity carried over to me and inspired me to createlikecrazy!


I can't wait to use all of my fun pun stickers that she made for me! =) Till next superbowl, Create like Crazy!!!
Wednesday, February 2, 2011
It's here!
My Yudu machine arrived today! It was very nicely packaged in a HUGE box! This Yudu is a lot larger than I remembered when I saw it for the first time in Michaels. The package came with the Yudu machine, one bottle of black ink, one emulsion sheet, one platform for the shirt, one screen, one squeegee, a started cd/dvd and instruction manual. I was a little disappointed that there are so many other things to buy before you can really do the projects you want. I need to purchase the emulsion remover so I can reuse my screen, I need to buy more emulsion sheets or liquid emulsion, and a lot more colors of paint!
I bought my machine on ebay and it was advertised as New in box with extras. As far as I can see, there are no extras. Oh well! At least I received my machine.
After reading through the manual, watching tons of youtube clips, and researching online how to use the Yudu, I have found that this is not a quick process. You have to attach your emulsion, burn your image and then finally make your shirt. I also have seen that it is a messy process as well! paint, can get on everything.
One thing I learned while searching online for Yudu related articles is that there is a Yudu machine for card makers! I actually want to purchase this machine too! one step at a time though. :)
I promise to have some pix of the machine soon and to actually create a project . Till then, create like crazy!!!!
Subscribe to:
Posts (Atom)