Showing posts with label Cricut. Show all posts

Monday, October 10, 2011

Baby Shower

My cousin & his wife are pregnant!  Yay!  I went to school with both of them and Tracey and I took many classes together and worked together for quite some time!  I was super excited when I heard they were pregnant!  These are pix from her shower yesterday.

Pom poms hanging from the ceiling. Inexpensive and fun! These are always a hit!

The sign across the mantle "It's a Boy"  They had an animal theme so we threw as many animals as we could in there! This sign was made using Create a Criter for then animals, Accent Essentials for the circles and sun bursts for the signs and Disney's Mickey's font for the letters!

A zebra and kitty welcomed people in!


These beautiful flowers were a wonderful touch! 

so pretty!  

Gift area


A few critters on the wall.

Cake pop favors

Wedding favor!

My friend just got married yesterday!  Congrats Kathy!!!  She and I have known each other since elementary school but became good friends in high school and have been friends ever since.  I was over joyed when I heard that she got engaged to a wonderful man named Stan. 

When they set their wedding date I was excited!  I wanted to help!  Graciously, Kathy allowed us to help her with her wedding invites and party favors!  This is my party favor indicating the table I sat at.  We used the Cricut to cut the tag and corner rounders on the white pieces to match the tag. The flower opening is from the Hello Kitty cartridge.

For not being a paper crafter, Kathy did an awesome job of designing the pattern on the white paper and thinking of these wonderful ideas!  Look out, I might be calling her in the future for digital artwork!  


Monday, June 27, 2011

Baby Finley!

My cousin in law Tracey is pregnant with her first baby!  I am so excited for Mark & Tracey! We found out a few months ago and ever since Jenn & I have been excited to throw this baby shower for Finley! 
Even though the shower is not until the end of the year, I couldn't resist making a sign!!!

F is for fish!

I is for Iguana!

N is for narwhal.  
This letter is tough unless you go with Nanny Goat or something. Amazingly Cricut thinks of everything and sure enough there was an animal on Zoobaloo for N! :) This letter is pushing me to write the name of the animal on the sign somewhere just so they know what it is!

L is for Lion! grrrr

E is for Elephant! (Go Titans!!!)


Y is for Yak!

These were made using Accent Essentials for the sun burst, Disney Font for the letters, Zoobaloo and Create a Critter for the animals.
So go out there and Create like Crazy!!!

crafty day!

Michelle & I had another crafting session!  We were so productive!  Here are the 3 cards we made together :) 

Michelle made this one with the mermaid.  Mermaid is from Life's a Beach. She added little crystals on the shiny shell paper to give it that extra "pop!"

The mermaid seashell bikini top is sequence! So creative!!! The background is embossed with swirls on shiny green paper!

Owl & branch are from Create a Critter (my all time favorite cartridge!) 3 jewels on the side because I couldn't resist and you know me, I love the bling! Wording to be stamped on the right of the owl. 

Very basic Hippo card. Hippo and water is from Create a Critter! This will most likely turn into a bday card!  :) 

Sunday, June 12, 2011

Vinyl engagement party favors!

    My very good friend just got engaged a few weeks ago.  We were so excited for her that my sister put together an intimate engagement party!  I was in charge of party favors!  :) woohoo!  So, here's what I put together. I bought a 12 pack of canning jars, pink and gray ribbon, white vinyl and pink vinyl.  On my Cricut I cut out different wedding items and the word "love".  Each jar got one image on the front and the word "love" on the back. (Sorry about the chair wheels in the background!!!)

I packaged the decorated canning jars with printed cellophane. 

The theme was penguins!

Finished product below!

We love you Kirk & Michelle!  Wishing you all the best!  

Monday, June 6, 2011

Glass Etching with the Cricut & Vinyl

I found this project online. It caught my attention and I was really skeptical about how easy it would be.  I tried it once and it worked beautifully!  Here's how it works! :)

What you need:
1. Glass project piece (I used a small canning jar)
2. Glass Etching Cream
3. Vinyl (size depends on the project, usually sold as 12" x 24" pieces
4. Transfer Tape (size depends on project, also sold as 12"x 24" pieces
5. Cricut machine
6. Cricut Mat
7. Cricut Sweetheart cartridge (or whichever cartridge has the design you want)
8. Cricut tools (to get the small pieces out of detailed images
9. Paint brush
10. Water to rinse project off


First measure your project working space.  I chose a jar whose side width measured 2 1/2" by 3" tall. 

Adhere your vinyl onto your mat. I cut my vinyl with a 1/4" border.  We will not use the cut out for the project, but instead, we are using the background cut out. You will see what I mean as we continue. 

I cut my image at 2 1/2 inches tall. This image is from the Sweetheart Cricut cartridge. My cutting pressure was on low on my Cricut Expression machine, this way it doesn't cut all the way through and I can remove the vinyl and it will be ready to stick on my glass. If you cut all the way through, it's okay too.  You just have to remove the backing from the vinyl to adhere it to the glass project. 
Below you see my cut out.


Once you have cut your vinyl, remove the image leaving only the outline. It is blue where I have removed the vinyl. 


Cut your transfer tape the same size as your vinyl square or slightly larger. The transfer tape I used looks a lot like masking tape! It's very thin and sticky! The backing has grids on it for cutting guide lines. Once you have cut your transfer paper, remove the backing. The backing again has the grid lines on it.  Place the transfer tape on top of your image and smooth out with the stick they provide (if you didn't get a stick, just use your hands, press hard.)  Once you have applied your transfer tape, lift the transfer tape with the attached vinyl off the mat, leaving the blue backing on the mat (you will throw the blue backing away. Also, with colored vinyl the backing may be white).


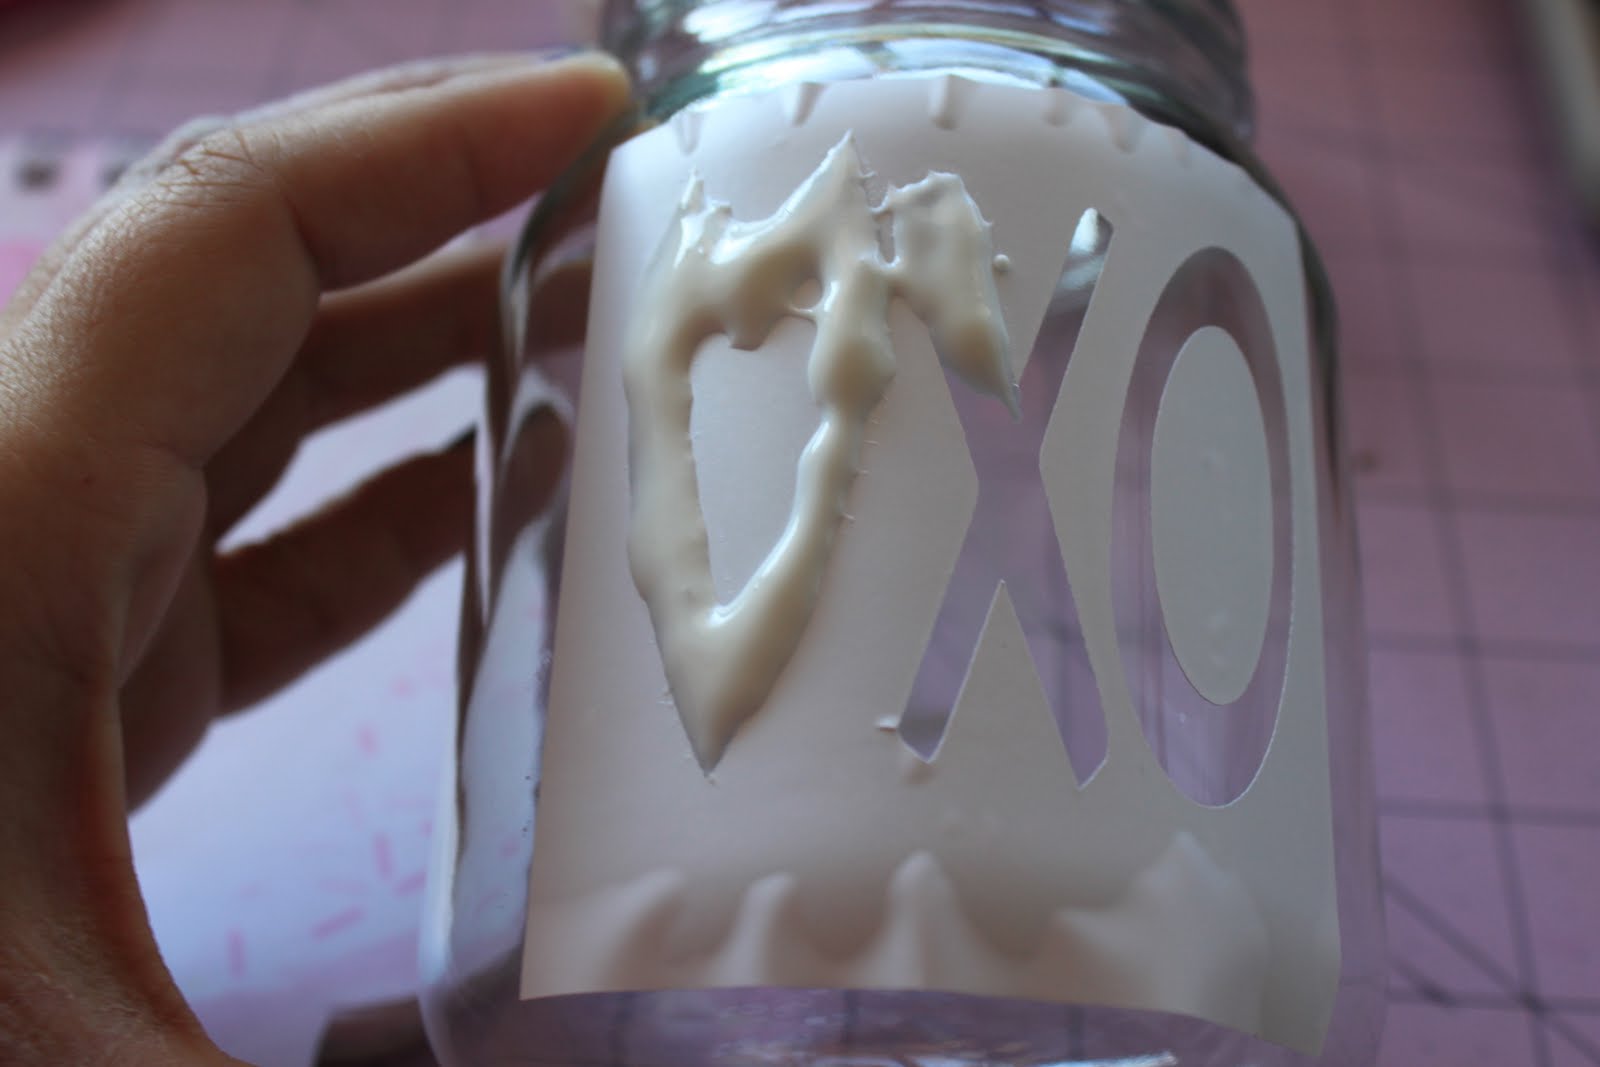
Adhere the vinyl to the glass project.  Smooth out the transfer tape as well as you can. Anywhere the vinyl isn't attached, the etching cream will get to. It is permanent so make sure you are very careful!


Apply the glass etching cream.  The brand I bought is called "Armour Etch" and can be found at Michaels or Joanns. A small bottle (3 oz.) was about 12.99 but you can use your 40% off coupon!  :) 

Be very generous with the etching cream.  The better you cover your image, the better it comes out.  As you can see I painted it on very thick so that I would get the best results.  Be careful to only put the cream where you want the glass to be etched.


The packaging says to leave the etching cream on the project for 5 minutes.  I left it on a little longer just to make sure it worked right. 

Once 5 minutes is up, rinse off your project under running water. use the brush to get all of the etching cream off and out of the groves.  Dry with a towel.

Remove the vinyl from your project to see the final results!


I put a piece of black paper behind the image so you could see it better, horrible picture i know, but you get the idea! 


Thanks for joining me in this glass etching adventure!  Don't forget to Create like Crazy!!!


BOOOO!!!

BOOO!!! Not like Halloween boo, more like...BOOOOO!!! SCAL is not available for the Cricut any longer!!! Just when I was about to buy it! Oh well!  So much for that, I still love my Cricut. It does make me want to explore other machines that are compatible with the computer though!  Having two machines isn't to much is it? hehe

Sunday, April 10, 2011

SVG files!

It's day 2 of the trial version of Sure Cuts A Lot (SCAL).  I'm loving it! Today I downloaded a free zip file. It contained a few Japanese blossom images, branches, flowers, etc.  I downloaded the images to my SVG folder on my desktop and was off to create like crazy!  

Once the images are downloaded, I opened SCAL and clicked on the SVG button.  I routed my way to my folder and there they were!  I clicked on the image I wanted on my mat and opened it.  You can resize, flip, move, and layer the images on your mat. I was just doing basics so I placed a few images on my mat. I hooked up my Cricut and pushed the cut button. The images cut just like they showed on my computer!

I can't wait to buy the actual program so these lines aren't cutting through my flower!  hehe :) 

Saturday, April 9, 2011

Sure Cuts A Lot

Today I downloaded the trial version of Sure Cuts A Lot Version 2 (SCAL V2).  I was excited to try it out with my Cricut Expression machine since the creators advertised that the software can use any font on your computer to cut!  No more font cartridges!

I downloaded the trial software from a website called mycuttingbuddy.com.  The process was easy, click on the version you need for your computer, PC or Mac, then add the free trial version to your cart. You will have to do the entire check out process even though you are paying nothing. No credit card is required. Then after you complete the process, you get to download the software. It installed pretty quickly on my mac.

Like any new program, it took a few minutes to figure out where everything is. It starts you off with the pointer so you can add objects, you have to click on the text button to add text. Then on the side (for my computer it was on the right side) there is a panel with all the fonts, sizes, and all the speciality buttons just like your Cricut or Gypsy! You can flip your words, black them out, move them closer together, just to name a few things. You can also change your mat size, zoom in and out, move around on the mat, etc!   I am a little sad that the cartidges don't work with the program but that was to be expected since it's not a ProvoCraft product.

I started simple so far, I have cut a "T" for my first name.  I chose my font, size, position on the mat, and it looked great. I was ready to cut.

Here are a few things I learned right away: 1. You have to have a cartridge in the Cricut, otherwise, it won't cut. The mat for the buttons is helpful too if you are like me and have been relying on the gypsy and forgotten where the load & unload buttons are!  2. You need the cable to connect to your computer (same cable as my printer used). 3. There will be one or more horizontal lines cut through your image since this is a trial version, I read that the full version will not do this (phew!)

I was quite happy with the design after it finished cutting. Everything cut all the way through, the size was what I had wanted, it cut exactly where it was laid out to cut and I think the image looked great.  I can't wait to try a few more things on it!

I was trying to make an image into an SVG file and it worked! It was really simple and fun! I can't wait to explore this option more! For now, I'm going to find more fonts that I love and maybe looking into downloading some free SVG files!  woohoo! I'm having so much fun Creating like Crazy!

Monday, March 28, 2011

wedding bucket

My hairdresser is engaged and going to be married in 2 weeks.  Last time I saw her she was talking up a storm about her wedding! It got me very excited for her! I decided that I wanted to make her something simple so this is what I came up with.
This is the paper that goes inside the clear bucket. The background is black, the shadow on the word is purple and the LOVE is in shiny white. The lettering was done on the Cricut using my Gypsy Font.
This is the top of the bucket.  I wanted a large flower for the top but couldn't find what I was imagining.  
Side shot, the hanging washer is used to open the can lid.
This is the candle i decorated inside the bucket. It is a small present but I wanted to give her something and with my limited budget with other weddings and such, I was happy with how it turned out.  The words were cut on the Cricut using the Sweetheart cartridge and the Gypsy.  This project took about 3 hours to complete but was well worth it. 

Don't forget, go out there and Create like Crazy! 


Monday, February 7, 2011

Creative Card Day with Michelle!

    What do you think of when you think of Sunday February 6th? I'm sure you are saying - SUPERBOWL! Well, for non-football fans, Michelle & myself, we decided to have a Creative Card Day!
    Michelle is super organized and was ready with 3 cards already set up in her Gypsy!  Me on the other hand, came with instructions for a card I never tried making and a bunch of supplies hoping that I would be able to create one card!  Thankfully Michelle's creativity carried over to me and inspired me to createlikecrazy!


    In a total of 6 hours we created 5 card designs and mass produced 8 of each design for a grand total of 40 cards in one day! So here are the 5 designs. I did a close up on the 2 I created.  I completely adore the 3 that Michelle made!
   I can't wait to use all of my fun pun stickers that she made for me! =)  Till next superbowl, Create like Crazy!!!

Wednesday, January 19, 2011

Bella's bday sign

I love making signs!  This one I made for a friend at work who's baby is turning 1 in February. The theme for the party is cupcakes, dark pink, light pink and green. So here's what I came up with. 
Hopefully the sign will go well with the party!  
Create like Crazy!

Tuesday, January 18, 2011

Crafty day!!!


Moving out was a huge deal for me. I got to move in with the man I love but in doing so, I moved further away from my family who I love and hung out with. I missed our crafting days, staying up till the wee hours of the night just making cards, conversing, etc. Thankfully God loves me and where one crafting door moved a little further away, he opened a new one closer to me! Michelle moved into town!
Michelle has been a family friend since my brother started Jr. High School. She got me my first job and even introduced me to my man. Since she has moved closer to me we have gone out to eat, get dessert, tea, get massages and have spent hours chit chatting and crafting! I absolutely love the time that we spend together!
We are both very into card making, shimmery paper, bling and our CRICUT! We exchange tips, good cartridge buys, websites, ideas and give each other advise. These were the two cards we came up with on our crafty day! I can't wait to have another so we can Create like Crazy!

Both cards were made with Simply Charmed for the Cricut. "Thank you" was from Alphalicious.